Executing Rules from Apex Triggers
As of v5.5.1, the InRule for Salesforce App supports the execution of rules from Update triggers with some limitations. For a full list of these limitations, references the Known Issues and Limitations of Executing Rules from Triggers section below.
To emphasize, only After Update and After Insert triggers are supported. Due to Salesforce's enforcement of all external service methods running asynchronously, trigger execution and persistence to the Salesforce database will always complete before rule execution has had time to finish, thus preventing the ability to execute rules on the "in-progress" entity image before it has been persisted. As an extension of this limitation, no entity image rollbacks can occur as a result of any validation done during or after the rule execution process.
As an alternative to Apex triggers, Salesforce Flows are a no-code alternative that can also be used to call InRule. For an overview of the differences between these two options, refer to the following Salesforce documentation: Record-Triggered Automation.
Adding a Rule Execution Trigger
To define a rule-executing trigger, create a new trigger on the entity of choice. The following example will use Account:
trigger example on Account (after update)
{
}
All operations, including calls to the rule execution service, will be contained within the If (!System.isFuture()) block:
trigger example on Account (after update)
{
    if (!System.isFuture())
    {
        //Trigger code goes here
    }
    else
    {
      return;
    }
}
Next, all rule executing triggers must contain the boilerplate wrapper around their code defined below. This is required to prevent infinite loops that may occur if the invoked rule edits the same entity.
Based on whether you're using an insert or update trigger and whether you want to pass the original or new entity values to the rules, use either Trigger.new or Trigger.old to access the entity image:
trigger example on Account (after update)
{
    if (!System.isFuture())
    {
        for (Account a : Trigger.new)
        {

        }
    }
    else
    {
      return;
    }
}
At this point, the only remaining required component is to call the rule execution service. To call the rule execution service from a trigger, invoke the inrule.DecisionClient.executeRulesFromTrigger method and pass the appropriate parameters:
trigger example on Account (after update)
{
    if (!System.isFuture())
    {
        for (Account a : Trigger.new)
        {
            inrule.DecisionClient.executeRulesFromTrigger('update', a.id, 'Account', 'AccountDefaultRules', false, null);
        }
    }
    else
    {
      return;
    }
}
The parameters for calling executeRulesFromTrigger, in order they fit into the signature:
| Parameter Name | Description |
|---|---|
| eventType | The event type for invoking rules. This will always be 'update'. |
| entityId | The unique Salesforce identifier for the root object in the request. This follows the naming convention of: "entityName.Id" |
| objectType | The Salesforce object type of the root object in the request |
| ruleSetName | The name of an explicit Rule Set to call as the entry point for rule execution. |
| useEntityPrefix | If set to true, the DecisionClient will append the entity label to the supplied rule set name. For example, if you pass in a ruleSetName of "DefaultRules" and set useEntityPrefix to true, the effective ruleSetName name would be "AccountDefaultRules" |
| ruleAppName (optional) | Optional. Defining and passing a RuleAppName here allows you to override the default Rule App Name defined in your Custom Setting created during initial configuration for this specific button. If you do not wish to override your Custom Setting, pass "null" here, as displayed in the example above. |
| entityImage (optional) | Optional. Defining and passing an entity image allows you to capture the entity image at time of trigger execution to ensure its state for rule execution, whereas leaving it out will require the execution to query Salesforce to get the current entity state, which may differ at that point from its state when trigger execution began due to the asynchronous nature of trigger execution. Passing an entity image requires you first to serialize it into a JSON string. An example of this can be found in the code sample below. If you do not wish to pass the entity image, you do not need to define it as null like with the ruleAppName. You can simply leave it out of the execution method signature altogether. |
An example of serializing and passing an entity image:
trigger example on Account (after update)
{
    if (!System.isFuture())
    {
        for (Account a: Trigger.new)
        {
            String entityImage = JSON.serialize(a)
            inrule.DecisionClient.executeRulesFromTrigger('update', a.id, 'Account', 'AccountDefaultRules', false, null, entityImage)
        }
    }
    else
    {
      return;
    }
}
At this point, all required components are set. Any operations you wish to include before/after the invocation of the rule execution service can be added at the points denoted below:
trigger example on Account (after update)
{
    if (!System.isFuture())
    {
        for (Account a : Trigger.new)
        {
            //Custom pre-rule execution code here
            inrule.DecisionClient.executeRulesFromTrigger('update', a.id, 'Account', 'AccountDefaultRules', false, null);
            //Custom post-rule execution code here
        }
    }
    else
    {
      return;
    }
}
It's important to note that any custom code written after the rule execution service has been called must not have any dependencies on outcomes of rule execution, as rule execution will be operating asynchronously, and trigger execution will continue and likely finish well before rule execution does.
Known Issues and Limitations of Executing Rules from Triggers
Currently, there are a number of known issues and limitations with executing rules from triggers:
- Currently, only After Update and After Insert triggers are supported. Due to Salesforce's enforcement of all external service methods running asynchronously, trigger execution and persistence to the Salesforce database will always complete before rule execution has had time to finish, thus preventing the ability to execute rules on the "in-progress" entity image before it has been persisted. As an extension of this limitation, no entity image rollbacks can occur as a result of any validation done during or after the rule execution process.
- Due to the asynchronous nature of trigger execution, the trigger will not wait on a response from the rule execution service before continuing with any additional code contained within it. Therefore, you cannot rely on having a rule response at any point during trigger execution, even if your code relying on it comes after your call to the execution service. It is not recommended to have any code in your trigger that relies on any data contained in the rule response.
- As a result of triggers' asynchronous nature, automatic data refresh on a record page as a result of rule execution is not supported in Classic view, since the page has no way of knowing when rule execution has completed. Notifications will still display once rule execution completes, but the page will have to be manually refreshed by a user for them to be able to see any updates to the record itself.
- Automatic data refresh on record pages is supported in Lightning, however, it requires giving all users that will be initiating triggers that execute rules Read permissions to the InRule_Event platform event. This can be done in two ways, both of which are explained in the below section Adding Permissions to InRule Platform Event
- Due to the fact that triggers execute asynchronously and Formula fields on entities are calculated and persisted asynchronously as well, any rules you attempt to execute from a trigger that make use of a Formula field will be caught in a race condition between the Formula field being calculated and persisted to the database and the rule execution service querying Salesforce to fetch the currently persisted value of that field. If persistence for the Formula field has not yet completed by the time the rule execution service reaches that point, it will pull down an out of date value for that field and your rules will execute using the wrong value. Therefore, it is strongly recommended that you do not execute rules that act on Formula fields from triggers. While there is a possibility for it to work correctly, there is a high chance for unexpected behavior to occur and there is no means of controlling whether it will work properly or not on any given execution of that Rule Set from a trigger.
Adding Permissions to InRule Platform Event
Displaying notifications and refreshing the entity form after rules are run from a trigger relies on a Salesforce Platform Event that is installed as part of the InRule package. However, by default, most Salesforce default user profiles do not have read access to Platform Events. In order for notifications to be displayed and data to be properly refreshed on a record page after rule execution via trigger, you must give your users read access to the InRule_Event platform event.
There are 2 methods of doing this, both with their own advantages and disadvantages. Which approach is best is ultimately dependent on the circumstances of your organization.
Add Platform Event Permissions via Editing Profiles
The first way of giving the needed permissions to your users is by editing their Profiles. In Salesforce, all users have an assigned Profile that defines their permissions in the environment. Granting the needed permissions to your users through this method can be as simple as editing the profile permissions of the user types that will be setting off your trigger(s). This approach has some pros and cons.
Pros:
- Makes changes to entire profiles rather than specific users, meaning once it is done, all that will need to be done for future users is to assign them to a profile with these permissions already granted and they'll be set
- If you are already using predominately custom/cloned Salesforce profiles in your environment, making this change is very quick, easy, and doesn't require any future overhead.
Cons:
- Cannot be accomplished with default profiles, which mandates cloning all of your profiles if your users are using predominately default profiles.
- Migrating all users from default profiles to new profile types can be highly time-intensive depending on the size of your org.
To do this approach, a user with system admin permissions must login to Salesforce and go to Setup.
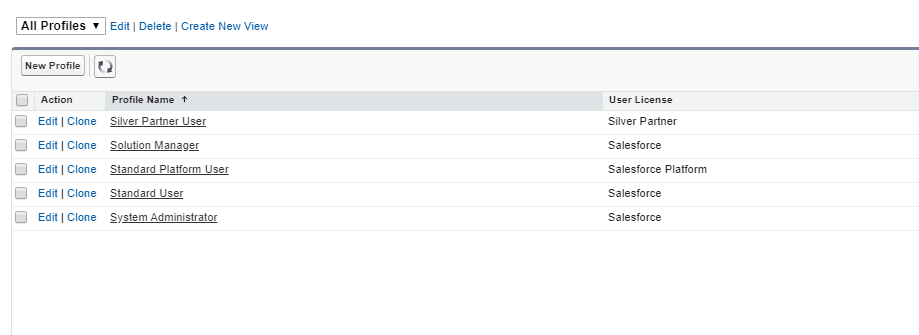
From there, search for Profiles:

Once you've navigated to the Profiles page, select the profile you wish to edit. For this example, we'll be granting the necessary permission to Standard Users
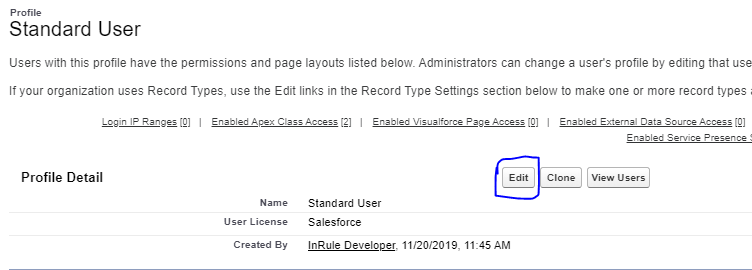
Once on that profile's page, select Edit:
Scroll down until you see the "Platform Event Permissions" header:

Check the "Read" checkbox, then scroll to the bottom of the page and press Save.
Repeat this process as needed for all profile types that need to be able to initiate rule executing triggers.
If the Read checkbox is greyed out for you and you can't select it, this means you're trying to edit a default Salesforce profile. Salesforce has several "default" profile types that are commonly used; the Standard User profile used in the example above is one such default profile. Unfortunately, Salesforce default profiles cannot be edited. This means that if you have users that will be setting off your trigger(s) that use default profile types, you will have to clone that profile, move your users from the default Salesforce profile over to the clone of it, and add the permission on the new profile clone.
To clone a profile, navigate to that profile's detail page as above, but instead of clicking "Edit," click "Clone."
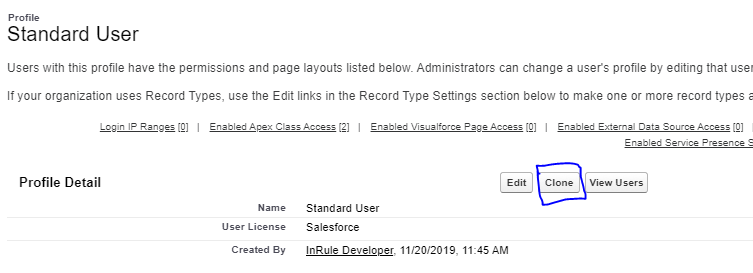
Name your new profile appropriately:

Hit save. Your new profile clone has been created. You should now be able to follow the steps above to add the appropriate Platform Event permission.
Once that's done, you need to move your users from the original profile over to the clone.
You will need to repeat this process for every profile type in your organization that needs UI updates when triggers run
Add Platform Event Permissions via InRule User Permission Set
The alternative approach to granting the necessary platform event to your users is to apply the InRule User Permission Set that is installed as a part of the InRule Salesforce package. This approach has its own pros and cons:
Pros:
- The InRule User Permission Set comes pre-installed and pre-configured with the InRule Salesforce package, making the only required step being to assign the permission set to the appropriate users
Cons:
- Permission Sets must be assigned to specific users, rather than profiles. This means that anytime a new user is created, the permission set must be independently added to that user, creating user management overhead. Managing this may not be viable within a large organization.
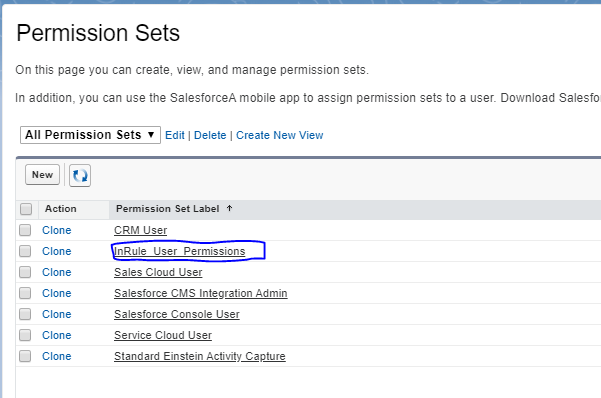
To add users to the InRule User Permission Set, go to Setup and search for Permission Set:

Find and select InRule_User_Permissions:
Select "Manage Assignments"
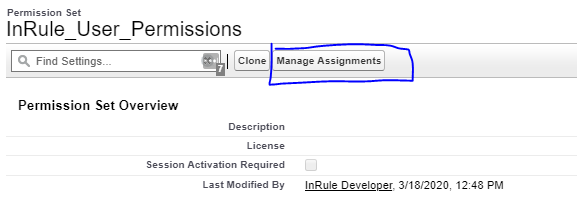
Select "Add Assignments"

You'll be presented with a list of all users in your environment. You can select all users that will need the ability to initiate rule executing triggers. Once you've selected all the relevant users, you can select "Assign," and the permission set will be assigned to all of those users.
These users will now be able to see UI updates when rules are run from triggers.