InRule Solution for Dynamics 365
At this point, all the Azure Requirements are met. We must now setup Dynamics, which can be done with either an AppSource Deployment or a PowerShell Deployment. If trying to deploy a previous version of the Dynamics solution, the PowerShell Deployment must be used.
- AppSource Deployment -- You can install the InRule Solution through Microsoft AppSource. The InRule listing can be found here in the Microsoft AppSource. Once the solution is deployed, you can proceed to Configuring the InRule Solution in Dynamics
- PowerShell Deployment -- You can follow the guide below to deploy the Dynamics package via PowerShell script. This is required if deploying a previous version of the Dynamics solution and relies on the resources from the Integration Framework zip file outlined in the section Optional Resource Files
You only need to deploy the InRule Solution by one of the two above methods. Doing both is unnecessary. Do not manually import included solution files. For upgrade scenarios, if the solution was previously deployed via AppSource the Power Platform Admin Center can be used to upgrade the solution.
1: Execute Deploy-CrmPackage.ps1
Navigate to the DynamicsDeployment directory of the InRule for Microsoft Dynamics 365 Integration Framework.zip where the Deploy-CrmPackage.ps1 script is located
If you are self-hosting and using S2S authentication in the execution service, you can pass in the Azure Active Directory application ID as the "AzureAppId" parameter to the Deploy-CrmPackage.ps1 script. This will automatically create a new Application User and assign it the included 'InRule Integration Administrator' role, but if desired you can skip this parameter and manually create Application User through the Power Platform Admin Center. If you were not involved in registering your Azure Active Directory application, your Azure administrator should be able to provide you with this ID. If you are using OAuth authentication for the Dynamics connection string configured in the execution service, you do not need to provide this parameter.
PS C:\DynamicsDeployment> .\Deploy-CrmPackage.ps1 -AzureAppId <app ID here>
Additionally, the script supports 2 other optional parameters: "SbNamespaceAddress" and "SasKey". These parameters allow you to pass in the fully qualified Relay Namespace Address (e.g., https://<<RelayNamespace>>.servicebus.windows.net/<<SB Relay Path>>) and Relay Key for the Relay your Rule Execution App Service is listening on and will allow the script to auto-configure your Dynamics instance to point at that Relay. These parameters operate independently of the "AzureAppId" parameter; they may be alongside it or on their own. However, if you opt to provide a value for either "SbNamespaceAddress" or "SasKey," you must provide a value for the other as well.
PS C:\DynamicsDeployment> .\Deploy-CrmPackage.ps1 -SbNamespaceAddress <service bus name here> -SasKey <service bus key here>
If you choose not to provide the "SbNamespaceAddress" and "SasKey" parameters, you will receive a notification (shown below) after the script finishes executing reminding you that you need to manually configure the SAS Namespace and SAS Key as outlined in Step 4 of this section.
The SAS Key needs to be set in the Rule Execution Service
 Endpoint Configuration in order to run rules
2: Provide Dynamics 365 Service Credentials
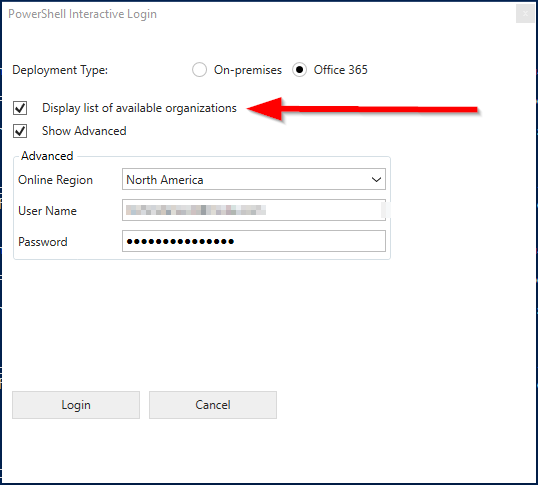
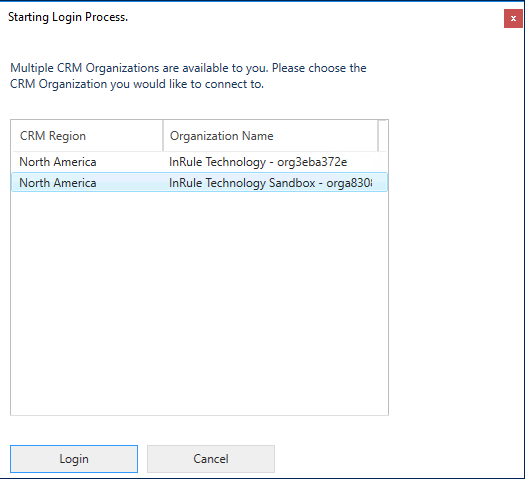
By default, the script will display an interactive login window to connect to Dynamics. Please be sure to check the 'Display list of available organizations' to make sure that you select the correct instance of Dynamics to install to.
Alternatively, the Deploy-CrmPackage.ps1 script also accepts a Dynamics Connection String:
.\Deploy-CrmPackage.ps1 -CrmConnectionString 'AuthType=Office365;Url=https://{DYNAMICSURL}.crm.dynamics.com/;Username={DYNAMICSUSERNAME};Password={DYNAMICSPASSWORD}'
Observe that no errors occur while the Deploy Script is running.
This deployment can take a long time to complete. In most cases it takes around 20 minutes.
3: Configure S2S App User
Dynamics 365 supports S2S authentication via Azure AD app as an alternative to username/password authentication. This removes the need to create a licensed user and avoids tying authentication to a regular named account. If you are using InRule SaaS, this Azure AD app has already been created and configured for you, but if you are self-hosting you can create your own Azure AD app as outlined in Registering an Azure Active Directory Application (Optional) and use it to authenticate.
Whichever method you are using, you will need to create an associated 'Application User' inside Dynamics. When configuring an InRule SaaS setup, you can follow the instructions in Dataverse Connectivity and Authorization, which will create and set up the Application User for you. If you are self-hosting, follow the steps here to create the application user in your environment. You will need the application ID from the earlier registration steps and the name of the Dynamics security role you want to assign to the user: Create an application user
These steps are only necessary for users that want to leverage S2S authentication and are self-hosting. If you are self-hosting, or using username/password OAuth authentication, you do not need to create an application user
4: Configure the InRule Solution in Dynamics
Next, we need to configure the Dynamics Solution that has been deployed to point to the Rule Execution Service available in Azure. As of InRule version 5.9.0, there are additional options available to support the new Dynamics Execution API and corresponding authentication as well as continued legacy support of the Azure Relay/Webjob integration model. This configuration is stepped through in detail in Rules Configuration and Settings.
5: Verify a Successful Deployment!
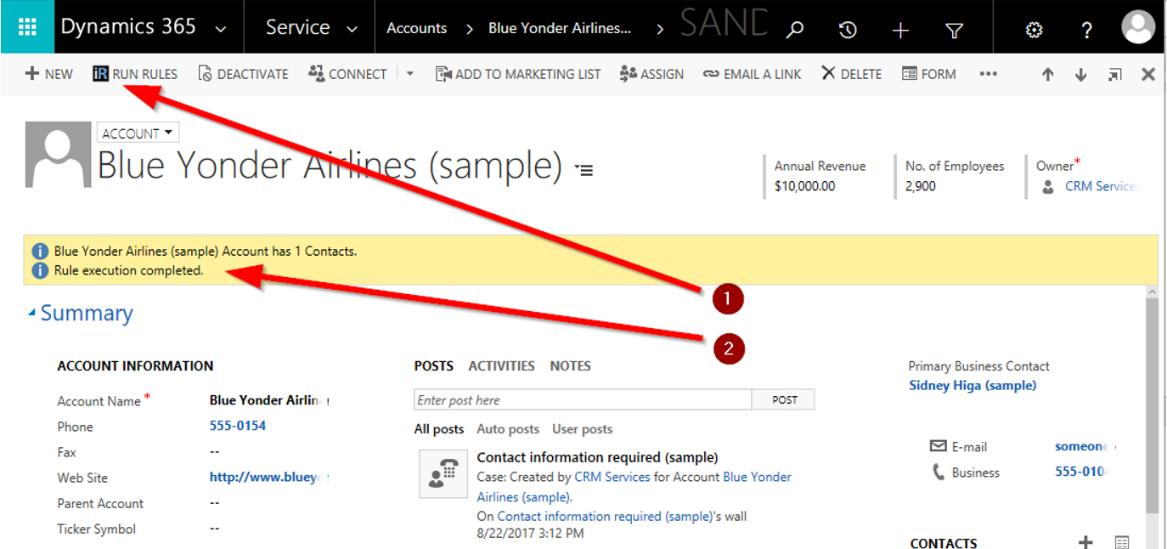
A Run Rules button will now exist on the edit form of all Dynamics entities. The way this button behaves will depend on the settings that have been configured under the Rule Configuration section; this document assumes the default configuration behavior. To understand what settings are available and what they mean, please see Rules Configuration and Settings of this document.
Open an Account and execute Run Rules. The default deployment is configured to run a Rule App from the catalog named DynamicsRules, which is what we uploaded to the catalog in the Verify Catalog stage. If everything has been set up correctly, you should see the "Rule Execution Completed" message and the description of the account will be updated to provide the date and time.
6: Getting Users Ready
While the parties responsible for deploying out InRule can likely leverage the Run Rules button without issue as they're likely to be system administrators, if your organization intends to empower non-admin users to be able to leverage the Run Rules button, they'll encounter permission issues. This is due to rule execution requiring access to various Dynamics configuration entities that normal users don't generally have permissions to touch.
To circumvent this, the InRule Solution for Dynamics ships with a pre-configured role called the "InRule Rule Executor," which contains the bare minimum permission set necessary for users to be able to make use of the Run Rules button. You'll need to assign any users in your organization to this role if the intent is to empower them to run rules through the Dynamics UI.
If there are any issues with executing rules and you are using an S2S user account from Section 3.2, check Known Issues, Limitations and Troubleshooting of this document. If you are using the connection string, make sure the user account specified has the necessary privileges to access the particular entity.